5 Common LED Strip Installation Mistakes and How to Avoid Them
Achieve stunning lighting with LED strips! Avoid common mistakes like choosing the wrong LED lights or voltage mismatches. Learn expert tips for a durable, beautiful, and efficient setup.
LED strip lights have become a popular choice for lighting projects. These lights can make your spaces look modern and interesting while being energy-efficient and easy to install. However, installations require technical knowledge to avoid mistakes affecting the final result.
Today, we will discuss the five most common mistakes when installing LED strips and how to avoid them.
1. Choosing the Wrong LED Strip

There are many different kinds of LED strips, and many people buy the first one they find without knowing if it's suitable for their project. Common mistakes include purchasing LED strips that lack the appropriate weather protection (IP rating) for an outdoor project or purchasing the wrong light output for your project.
To select the LED strip light that best suits your project, it is important to understand its requirements. If the installation will be outdoors, your strips must have an IP rating of 65 or higher.
If the purpose of the light is going to be accent, task, or main lighting, what is the intensity and color temperature needed? Or even what color should the lights be? This should be clear before buying. If you have questions, it is best to get expert advice.
2. Using an Inappropriate Power Supply
Many people believe LED strips are easy to install as they are all plug and play. However, most installations require LED drivers. A common mistake when installing LED strips is using an inadequate power supply. When the output voltage of the LED driver does not match the voltage of the lights, the LED strips can malfunction, flicker, or even get damaged.
It is essential to ensure compatibility, as it not only affects the performance of the lights but could also represent a safety risk, causing short circuits or overloading.
The solution to this problem requires some math. If you want to avoid calculations, contact an expert to do it for you. If you want to do it yourself, here is a way to calculate which power supply you need for your project.
Remember to check the technical specifications of the LED strip, especially the voltage. Is it 12V or 24V? This will help you calculate the total wattage your project will draw and the power wattage you need from your power supply.
Please note that you shouldn’t use your power supply at 100% capacity. As a general rule, aim to use 80% of an LED driver’s total wattage to ensure optimal performance for your lights.
3. Cutting Strips in the Wrong Place

Another simple installation error is cutting your LED strips in the wrong place.
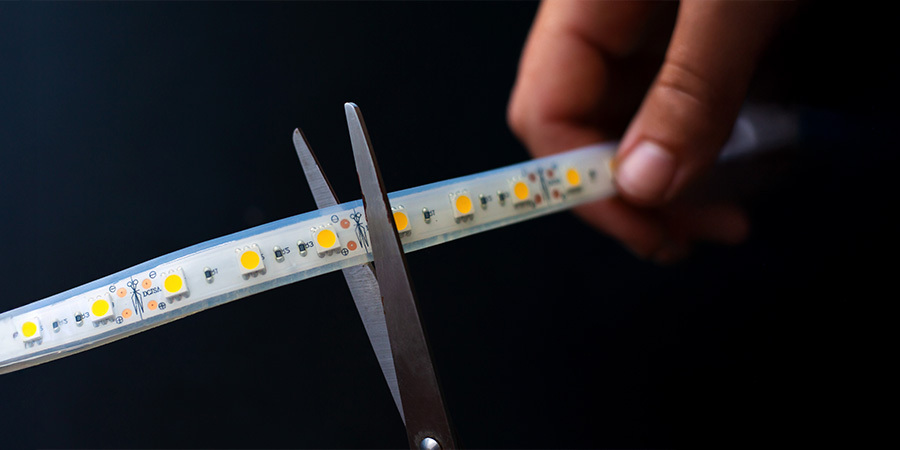
LED strips can be cut, but not anywhere you like. Making a wrong cut can cause damage, such as sections failing to light. LED strips are designed to be cut only at specific points, usually marked with lines or scissor symbols. If cut outside these marks, the internal circuits are interrupted, preventing the flow of electricity.
If you need to join two strip sections, use specific connectors for LED strips.
4. Choosing Incompatible Controllers or Dimmers
Another common mistake when installing your LED lights is using inadequate accessories, such as the wrong controllers or dimmers for color-changing lights or adjusting brightness.
This limits the lights' potential since you cannot use RGB strips’ color changing capabilities or adjust the intensity on dimmable strips. Additionally, attempting to adjust these functions manually or with incorrect equipment can damage the LED strip.
The solution is to identify whether your LED strip is adjustable (such as RGB, RGBW, or dimmable products) and use an appropriate controller or dimmer. Follow the manufacturer's instructions carefully during installation to avoid potential issues or damage to the lights.
5. Forgetting the Aluminum Channels

Although not using aluminum channels to install your LED strips is not a mistake, it is always best if you use them to avoid hotspots, uneven distribution of light, peeling off over time, and a reduced lifespan of your LEDs due to overheating and exposure to dust, water, and other external factors.
To prevent this, aluminum channels help dissipate heat, protect the strips from dust, and provide a more polished appearance. They also come with diffusing covers that soften the light.
It is essential that the channel you choose is compatible with your strip and that you follow the assembly instructions to secure it correctly. This will improve its visual appearance and make your installation more durable.
Trust Lighting Experts to Help You Plan Your Project
Avoiding these common LED strip light installation mistakes is key to ensuring a successful project and fully enjoying your lights' advantages. Consult our complete guide for the correct installation of your LED lights.
However, planning a project can be overwhelming, especially if you have no prior experience. At Flexfire LEDs, we're here to simplify that process. Our team of experts will help you select the right products and give you the advice you need for your project. Trust us to transform your ideas into an efficient, attractive, and long-lasting lighting system.


